Friday, January 30, 2015

Spinner in Toolbar Example in Android

Step: 1
======
SpinToolbarActivity.java

package com.pratap.cardviews1;
import java.util.ArrayList;
import android.os.Bundle;
import android.support.v7.app.ActionBarActivity;
import android.support.v7.widget.Toolbar;
import android.view.Menu;
import android.view.MenuItem;
import android.view.View;
import android.widget.AdapterView;
import android.widget.AdapterView.OnItemSelectedListener;
import android.widget.Spinner;
import android.widget.Toast;

public class SpinToolbarActivity extends AppCompatActivity {

private Toolbar toolbar;

private Spinner spinner_nav;

@Override
protected void onCreate(Bundle savedInstanceState) {
super.onCreate(savedInstanceState);
setContentView(R.layout.spintoolbaractivity);
toolbar = (Toolbar) findViewById(R.id.toolbar);
spinner_nav = (Spinner) findViewById(R.id.spinner_nav);

if (toolbar != null) {
setSupportActionBar(toolbar);
getSupportActionBar().setDisplayShowTitleEnabled(false);

}
addItemsToSpinner();

}

// add items into spinner dynamically
public void addItemsToSpinner() {

ArrayList<String> list = new ArrayList<String>();
list.add("Top News");
list.add("Politics");
list.add("Business");
list.add("Sports");
list.add("Movies");

// Custom ArrayAdapter with spinner item layout to set popup background

CustomSpinnerAdapter spinAdapter = new CustomSpinnerAdapter(
getApplicationContext(), list);


// Default ArrayAdapter with default spinner item layout, getting some
// view rendering problem in lollypop device, need to test in other
// devices

/*
* ArrayAdapter<String> spinAdapter = new ArrayAdapter<String>(this,
* android.R.layout.simple_spinner_item, list);
* spinAdapter.setDropDownViewResource
* (android.R.layout.simple_spinner_dropdown_item);
*/

spinner_nav.setAdapter(spinAdapter);

spinner_nav.setOnItemSelectedListener(new OnItemSelectedListener() {

@Override
public void onItemSelected(AdapterView<?> adapter, View v,
int position, long id) {
// On selecting a spinner item
String item = adapter.getItemAtPosition(position).toString();

// Showing selected spinner item
Toast.makeText(getApplicationContext(), "Selected : " + item,
Toast.LENGTH_LONG).show();
}

@Override
public void onNothingSelected(AdapterView<?> arg0) {
// TODO Auto-generated method stub

}
});

}

@Override
public boolean onCreateOptionsMenu(Menu menu) {
// Inflate the menu; this adds items to the action bar if it is present.
getMenuInflater().inflate(R.menu.main, menu);
return true;
}

@Override
public boolean onOptionsItemSelected(MenuItem item) {
// Handle action bar item clicks here. The action bar will
// automatically handle clicks on the Home/Up button, so long
// as you specify a parent activity in AndroidManifest.xml.
int id = item.getItemId();
if (id == R.id.action_settings) {
Toast.makeText(getApplicationContext(), "Settings Clicked",
Toast.LENGTH_SHORT).show();
return true;
} else if (id == R.id.action_search) {
Toast.makeText(getApplicationContext(), "Search Clicked",
Toast.LENGTH_SHORT).show();
return true;
} else if (id == R.id.action_add) {
Toast.makeText(getApplicationContext(), "Add Clicked",
Toast.LENGTH_SHORT).show();
return true;
} else if (id == R.id.action_delete) {
Toast.makeText(getApplicationContext(), "Delete Clicked",
Toast.LENGTH_SHORT).show();
return true;
}
return super.onOptionsItemSelected(item);
}
}


toolbar.xml


<?xml version="1.0" encoding="utf-8"?>
<android.support.v7.widget.Toolbar xmlns:android="http://schemas.android.com/apk/res/android"
xmlns:app="http://schemas.android.com/apk/res-auto"
xmlns:tools="http://schemas.android.com/tools"
android:id="@+id/toolbar"
android:layout_width="match_parent"
android:layout_height="wrap_content"
android:background="?attr/colorPrimaryDark"
android:minHeight="?attr/actionBarSize"
app:popupTheme="@style/ThemeOverlay.AppCompat.Light"
>

<Spinner
android:id="@+id/spinner_nav"
android:layout_width="wrap_content"
android:layout_height="wrap_content" />

</android.support.v7.widget.Toolbar>

spintoolbaractivity.xml


<?xml version="1.0" encoding="utf-8"?>
<LinearLayout xmlns:android="http://schemas.android.com/apk/res/android"
android:layout_width="match_parent"
android:layout_height="match_parent"
android:background="#c9c9c9"
android:orientation="vertical" >

<include
android:id="@+id/toolbar"
layout="@layout/spintoolbar" />


</LinearLayout>


Step: 2
======
CustomSpinnerAdapter.java


package com.pratap.cardviews1;

import java.util.ArrayList;
import android.content.Context;
import android.content.res.Resources;
import android.view.LayoutInflater;
import android.view.View;
import android.view.ViewGroup;
import android.widget.ArrayAdapter;
import android.widget.TextView;

// Custom Adapter for Spinner
public class CustomSpinnerAdapter extends ArrayAdapter<String> {

private Context context1;
private ArrayList<String> data;
public Resources res;
LayoutInflater inflater;

public CustomSpinnerAdapter(Context context, ArrayList<String> objects) {
super(context, R.layout.spinner_row, objects);

context1 = context;
data = objects;

inflater = (LayoutInflater) context1
.getSystemService(Context.LAYOUT_INFLATER_SERVICE);

}

@Override
public View getDropDownView(int position, View convertView, ViewGroup parent) {
return getCustomView(position, convertView, parent);
}

@Override
public View getView(int position, View convertView, ViewGroup parent) {
return getCustomView(position, convertView, parent);
}

// This funtion called for each row ( Called data.size() times )
public View getCustomView(int position, View convertView, ViewGroup parent) {

View row = inflater.inflate(R.layout.spinner_row, parent, false);

TextView tvCategory = (TextView) row.findViewById(R.id.tvCategory);

tvCategory.setText(data.get(position).toString());

return row;
}
}


spinner_row.xml


<?xml version="1.0" encoding="utf-8"?>
<RelativeLayout xmlns:android="http://schemas.android.com/apk/res/android"
android:layout_width="match_parent"
android:layout_height="wrap_content"
android:layout_margin="5dp"
android:background="@drawable/spinner_selector"
android:orientation="vertical" >

<TextView
android:id="@+id/tvCategory"
android:layout_width="wrap_content"
android:layout_height="wrap_content"
android:layout_margin="10dp"
android:textSize="18sp"
/>

</RelativeLayout>

values/styles.xml

<resources xmlns:android="http://schemas.android.com/apk/res/android">

<style name="AppTheme" parent="AppTheme.Base" />

<style name="AppTheme.Base" parent="Theme.AppCompat.NoActionBar">
<!-- your app branding color for the app bar -->
<item name="colorPrimary">@color/md_teal_500_primary</item>

<!-- darker variant for the status bar and contextual app bars -->
<item name="colorPrimaryDark">@color/md_teal_700</item>

<!-- theme UI controls like checkboxes and text fields -->
<item name="colorAccent">@color/md_teal_900</item>


</style>

</resources>


Screenshot:
======


Update:
======

Since the spinner dropdown is not like the new LollyPop Design like Spinner:

We need to add small code for the spinner control

 android:dropDownVerticalOffset="-52dp" for Kitkat and below

 android:dropDownVerticalOffset="0dp" for LollyPop


 <Spinner
        android:id="@+id/spinner_nav"
        android:layout_width="wrap_content"
        android:layout_height="wrap_content"
        android:dropDownVerticalOffset="@dimen/dropDownVerticalOffset" />


Wednesday, January 28, 2015

Quick Bible is BACK on Play Store!

Dear readers,

A few months earlier, Quick Bible app went missing on Play Store, because our dev account was closed by Google. We don't exactly know why, considering a giant like Google, they may have a valid reason, it's just they never explain it to us. But it could be due to our other apps that was indeed suspended before this happen. We believe Quick Bible itself has nothing to do with it. We are sorry for the trouble caused.

But just few days ago, we launched the new Quick Bible on the Store. It come back better than ever too! Go to this link to download it http://goo.gl/OYpqlq

There are many interesting new feature that you should try:

New UI theme
 - Brand new Material Design
 - Navigation Drawer on the left

Sync markers and verse history to all of your devices

Gestures
 - Swipe to change chapters
 - Two-finger up/down to full screen mode
 - Pinch to zoom

Bookmarks
- Add multiple bookmarks/notes in a verses
- Create verse link while writing note

Progress markers
- Progress icon in navigation drawer
- Long-press and drag icon straight from drawer to add progress mark

Translations/Versions
- Background download of new bible versions
- Bible version can be updated anytime
- Better UI design

Search engine
- Search in different Bible versions
- Book categories selector
- recent search history

Then what about my markers data that is stored in the old app??
Don't worry, we have made the solution too. When you first open the new Quick Bible app, a page will be opened and you have a choice to transfer all your markers data to the new app. The old app actually create stored data automatically. Therefore you can decide which data you want to be transfered.

If you please, you can help us rate and share this app to your friends, on facebook/any other social media.

Below is some screenshots of the app:


Monday, January 26, 2015

Flick Shoot 2 Cheats

Unlimited Coins, Unlimited Ticket, Unlimited Items Unlocked, All Game Modes Unlocked                                                                                                                                                           Flick Shoot 2 Cheats
Flick Shoot 2 Cheats

UPDATED ON MARCH 31, 2016
ONLY WORK FOR ROOTED DEVICES, GET ROOT!

YOU WILL GET
 • Unlimited Coins
 • Unlimited Ticket
 • Unlimited Items Unlocked
 • All Game Modes Unlocked

DESCRIPTION
 • Flick Shoot 2 v1.26 game save file
 • Will work to newer version
 • You can update the game after applied this cheat
 • Must be extracted using ES Explorer

TESTED AND WORKS ON
 • Android 4.4.4
 • Android 4.4.2
 • Android 4.2.1
 • May work on Lollipop

WARNING!!!
 • This will remove your current progress!
 • Backup your game data!
Go to /data/data/ find net.mobilecraft.flickshoot2 folder - copy to your backup location
 • Not sure..., try on Bluestacks

LET'S DO IT
 • Force stop game and clear data
 • Download game save file | big button between the ads
 • Extract to  /data/data/ 
 • Run your game and enjoy!

IMPORTANT!
  • How to to root your phones
  • How to force stop game and clear data
  • How to extract game save to /data/data/
  • Must-Have phone accessories  ads
  • How to get access to /data/data/
  • How to backup game data
  • How to check root on your device

Sunday, January 25, 2015

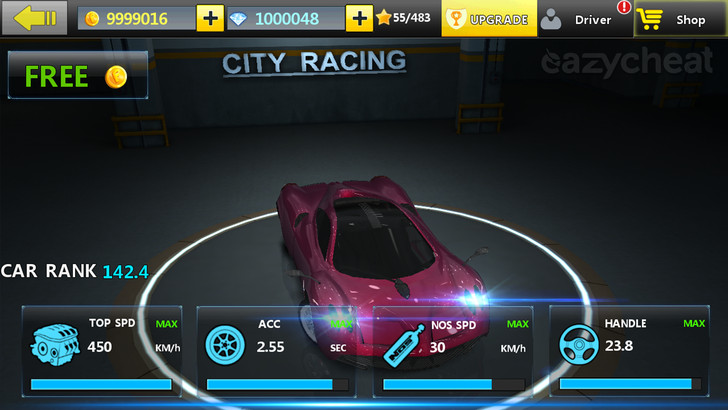
City Racing 3D Cheats

Unlimited Gold, Unlimited Diamond, VIP 5, All Cars Owned and Fully Upgraded.                                                                                                                                                             City Racing 3D Cheats
City Racing 3D Cheatsclick on the image to see more screenshot

UPDATED ON MARCH 22, 2016
ALSO WORK FOR NON ROOTED DEVICES, GET ROOT!

YOU WILL GET
 • VIP 5
 • Unlimited Diamond
 • Unlimited Gold
 • All Cars Owned and Fully Upgraded

DESCRIPTION
 • City Racing 3D v2.6.078 game save file
 • Will work to newer version
 • You can update the game after applied this cheat
 • Need to install notepad++ to your computer
 • Need to edit save file with notepad++

TESTED AND WORKS ON
  • Android 4.4.4
  • Android 4.4.2
  • Android 4.2.1
  • May work on Lollipop

WARNING!!!
  • This will remove your current progress!
  • Backup your game data!
Go to /Android/data/ find com.racergame.cityracing3d folder and copy to your backup location
  • Not sure..., try on Bluestacks

LET'S DO IT
  • Dwonload and install notepad++ to edit save file with computer
  • Go to /sdcard/Android/data/com.racergame.cityracing3d/files
  • Find rc.sav file and rename it to rc.sav.bak
  • Download rc.sav file | big button between the ads
  • Copy rc.sav and rc.sav.bak files to your computer
  • Open rc.sav and rc.sav.bak files with notepad++

  • Copy the first 15 character from rc.sav.bak file

  • Paste to downloaded rc.sav file

  • Click Save [ DO NOT SAVE AS ]

  • Back to your phone
  • Force stop your game [ Don't clear game data ]
  • Copy modified rc.sav file to :
      /sdcard/Android/data/com.racergame.cityracing3d/files
  • Run your game and enjoy

IMPORTANT!
  • How to download game save file
  • How to to root your phones
  • How to force stop game and clear data
  • How to extract game save to /Android/data/
  • Must-Have phone accessories  ads
  • How to get access to /data/data/
  • How to backup game data
  • How to check root on your device

Friday, January 23, 2015

Trial Xtreme 3 Cheats

9999999 Coins, All Bike Accessories Owned, All Rider Accessories Owned, All Arena Unlocked.                                                                                                                                                             Trial Xtreme 3 Cheats
Trial Xtreme 3 Cheatsclick on the image to see more screenshot

UPDATED ON JANUARY 23, 2015

DESCRIPTION
 • Trial Xtreme 3 game save file
 • 9999999 Coins
 • All Bike Accessories Owned
 • All Rider Accessories Owned
 • All Arena Unlocked
 • You can update the game after applied this cheat
 • Only work for rooted devices

TESTED AND WORKS ON
  • Jiayu G5 phone and several devices.
  • Trial Xtreme 3 v6.8
  • Android 4.2.1 | 4.4.2

WARNING!!!
  • This will remove your current progress!
  • Backup your game data!

LET'S DO IT
  • Force stop and clear your game data
  • Download game save file
  • Extract to /data/data/ 
  • Run your game and enjoy

IMPORTANT!
  • How to Clear game data
  • How to extract game save to /data/data/
  • How to get access to /data/data/
  • How to backup game data
  • How to check root on your device

Monday, January 19, 2015

Turbo Kids Cheats

All Avatar and Skill Fully Upgraded.                                                                                                                                                             Turbo Kids Cheats
Turbo Kids Cheatsclick on the image to see more screenshot

LAST UPDATED ON JANUARY 17, 2015

DESCRIPTION
 • Turbo Kids game save with All Avatar and Skill Fully Upgraded
 • Why game save? - game save file is the easiest and safest cheat method, you can update the game after applied this cheat.

TESTED AND WORKS ON
  • Rooted Jiayu G5 phone and several devices.
  • Turbo Kids version 1.0.9
  • Android 4.2.1 | 4.4.2

WARNING!!!
  • This will remove your current progress!
  • Root access is required!
  • Backup your game data!

LET'S DO IT
  • force stop and clear your game data
  • Download game save file
  • Extract to /data/data/ directory
  • Run your game and enjoy

IMPORTANT!
  • How to force stop and clear game data
  • How to extract game save to /data/data/ directory
  • How to get access to /data/data/ directory
  • How to backup game data
  • How to check root on your device

Friday, January 16, 2015

Dead Trigger Cheats

Unlimited Money and Unlimited Golds.                                                                                                                                                             Dead Trigger Cheats
Dead Trigger Cheatsclick on the image to see more screenshot

LAST UPDATED ON JANUARY 17, 2015

OVERVIEW
 • Dead Trigger game save file Unlimited Money and Unlimited Golds.
 • Why game save? - game save file is the easiest and safest cheat method, you can update the game after applied this cheat.

TESTED AND WORKS ON
  • Rooted Jiayu G5 phone and several devices.
  • Dead Trigger version 1.8.2
  • Android 4.2.1 | 4.4.2

WARNING!!!
  • This will remove your current progress!
  • Root access is required!
  • Backup your game data!

LET'S DO IT
  • force stop and clear your game data
  • Download game save file
  • Extract to /data/data/ directory
  • Run your game and enjoy

IMPORTANT!
  • How to download game save file
  • How to force stop and clear game data
  • How to extract game save to /data/data/ directory
  • How to get access to /data/data/ directory
  • How to backup game data
  • How to check root on your device

Tuesday, January 13, 2015

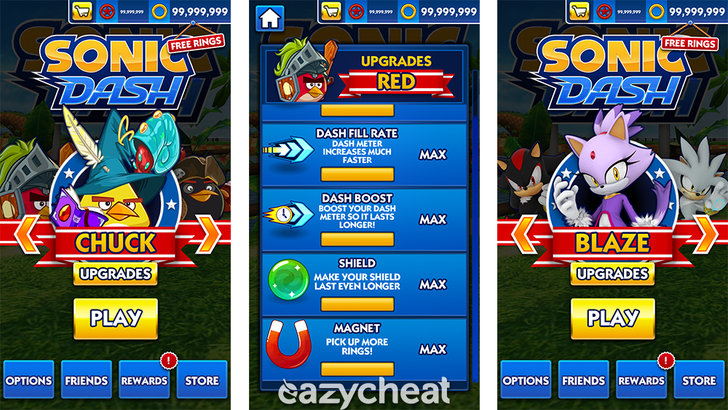
Sonic Dash Cheats

Unlimited Red Stars, Unlimited Stars, Unlimited PowerUps, Max Upgrades, All Characters Unlocked.                                                                                                                                                            Sonic Dash Cheats
Sonic Dash Cheats

Sonic Dash Cheats

UPDATED ON MARCH 21, 2016
ALSO WORK FOR NON ROOTED DEVICES, GET ROOT!

YOU WILL GET
 • Unlimited Red Stars
 • Unlimited Stars
 • Unlimited PowerUps
 • Max Upgrades
 • All Characters Unlocked (except espio)

DESCRIPTION
 • Sonic Dash v3.0.0.Go game save file
 • Will work to newer version
 • You can update the game after applied this cheat
 • Must be extracted using ES Explorer

TESTED AND WORKS ON
  • Android 4.4.4
  • Android 4.4.2
  • Android 4.2.1
  • May work on Lollipop

WARNING!!!
  • This will remove your current progress!
  • Backup your game data!
Go to /Android/data/ find com.sega.sonicdash folder and copy to your backup location
  • Not sure..., try on Bluestacks

LET'S DO IT
  • Force stop game and clear data
  • Download game save file | big button between the ads
  • Extract to  /Android/data/ 
  • Run your game and enjoy!

IMPORTANT!
  • How to to root your phones
  • How to force stop game and clear data
  • How to extract game save to /Android/data/
  • Must-Have phone accessories  ads
  • How to get access to /data/data/
  • How to backup game data
  • How to check root on your device

Crossy Road Cheats

Unlimited Coins, All Characters Unlocked.                                                                                                                                                             Crossy Road  Cheats
Crossy Road Cheatsclick on the image to see more screenshot

UPDATED ON JANUARY 07, 2016

UPDATED VERSION
 • Crossy Road v1.6.1 Cheats

DESCRIPTION
 • Crossy Road v1.3.8 game save file
 • Unlimited Coins
 • All 140 Characters Unlocked
 • You can update the game after applied this cheat
 • Also work for NON ROOTED devices
 • Must be extracted using ES Explorer

TESTED AND WORKS ON
  • Android 4.4.4
  • Android 4.4.2
  • Android 4.2.1
  • May work on lollipop

WARNING!!!
  • This will remove your current progress!
  • Backup your game data!
Go to /android/data/ find com.yodo1.crossyroad folder and copy to your backup location
  • Not sure..., try on Bluestacks

LET'S DO IT
  • Force stop game and clear data
  • Download game save file | at the bottom of this page
  • Extract to /Android/data/ 
  • Run your game and enjoy!

IMPORTANT!
  • How to force stop game
  • How to extract game save to /Android/data/
  • How to backup game data
  • How to find the best cheap phones  ads
  • How to to root your device
  • How to check root on your device

Monday, January 12, 2015

Endless RecyclerView OnScrollListener Example in android


Note:

I have updated this post.Please see the updated post


If you have thousands of records in your database server, rather than getting all records loading at a time, try to load some x number of records in the onscroll event and update the ui,

Example:
If you have 1000 records in the server db, get 50 records first time, if the user reached to the last record in the ui, then again load 50 more records in the onscrolllistener event.

Step: 1
======
In this example, i am using following github code snippet for endless RecyclerView

Credit goes to: WoongBi Kim
https://gist.github.com/ssinss/e06f12ef66c51252563e

Step: 2
======

Now, Create an Activity with RecyclerView in the XML Layout file.

CardViewActivity.java


  1
2
3
4
5
6
7
8
9
10
11
12
13
14
15
16
17
18
19
20
21
22
23
24
25
26
27
28
29
30
31
32
33
34
35
36
37
38
39
40
41
42
43
44
45
46
47
48
49
50
51
52
53
54
55
56
57
58
59
60
61
62
63
64
65
66
67
68
69
70
71
72
73
74
75
76
77
78
79
80
81
82
83
84
85
86
87
88
89
90
91
92
93
94
95
96
97
98
99
100
101
102
103
104
105
106
107
108
109
110
package com.pratap.cardviews1;

import java.util.ArrayList;
import java.util.List;
import android.os.Bundle;
import android.support.v7.app.ActionBarActivity;
import android.support.v7.widget.LinearLayoutManager;
import android.support.v7.widget.RecyclerView;
import android.support.v7.widget.Toolbar;

public class CardViewActivity extends AppCompatActivity {

private Toolbar toolbar;

private RecyclerView mRecyclerView;
private RecyclerView.Adapter mAdapter;
private LinearLayoutManager mLayoutManager;

private List<Student> studentList;

// on scroll

private static int current_page = 1;

private int ival = 1;
private int loadLimit = 10;

@Override
protected void onCreate(Bundle savedInstanceState) {
super.onCreate(savedInstanceState);
setContentView(R.layout.activity_main);
toolbar = (Toolbar) findViewById(R.id.toolbar);

studentList = new ArrayList<Student>();

loadData(current_page);

if (toolbar != null) {
setSupportActionBar(toolbar);
getSupportActionBar().setTitle("Android Students");

}

mRecyclerView = (RecyclerView) findViewById(R.id.my_recycler_view);

// use this setting to improve performance if you know that changes
// in content do not change the layout size of the RecyclerView
mRecyclerView.setHasFixedSize(true);

mLayoutManager = new LinearLayoutManager(this);

// use a linear layout manager
mRecyclerView.setLayoutManager(mLayoutManager);

// create an Object for Adapter
mAdapter = new CardViewDataAdapter(studentList);

// set the adapter object to the Recyclerview
mRecyclerView.setAdapter(mAdapter);

mRecyclerView.setOnScrollListener(new EndlessRecyclerOnScrollListener(
mLayoutManager) {
@Override
public void onLoadMore(int current_page) {
// do somthing...

loadMoreData(current_page);

}

});

}
// By default, we add 10 objects for first time.
private void loadData(int current_page) {

// I have not used current page for showing demo, if u use a webservice
// then it is useful for every call request

for (int i = ival; i <= loadLimit; i++) {
Student st = new Student("Student " + i, "androidstudent" + i
+ "@gmail.com", false);

studentList.add(st);
ival++;

}

}
// adding 10 object creating dymically to arraylist and updating recyclerview when ever we reached last item
private void loadMoreData(int current_page) {

// I have not used current page for showing demo, if u use a webservice
// then it is useful for every call request

loadLimit = ival + 10;

for (int i = ival; i <= loadLimit; i++) {
Student st = new Student("Student " + i, "androidstudent" + i
+ "@gmail.com", false);

studentList.add(st);
ival++;
}

mAdapter.notifyDataSetChanged();

}

}

activity_main.xml


1
2
3
4
5
6
7
8
9
10
11
12
13
14
15
16
17
18
19
<?xml version="1.0" encoding="utf-8"?>
<LinearLayout xmlns:android="http://schemas.android.com/apk/res/android"
android:layout_width="match_parent"
android:layout_height="match_parent"
android:orientation="vertical" >

<include
android:id="@+id/toolbar"
layout="@layout/toolbar" />

<android.support.v7.widget.RecyclerView
android:id="@+id/my_recycler_view"
android:layout_width="match_parent"
android:layout_height="0dp"
android:layout_margin="5dp"
android:layout_weight="1"
android:scrollbars="vertical" />

</LinearLayout>


Step: 3
======
EndlessRecyclerOnScrollListener.java


1
2
3
4
5
6
7
8
9
10
11
12
13
14
15
16
17
18
19
20
21
22
23
24
25
26
27
28
29
30
31
32
33
34
35
36
37
38
39
40
41
42
43
44
45
46
47
48
49
50
51
52
53
package com.pratap.cardviews1;

import android.support.v7.widget.LinearLayoutManager;
import android.support.v7.widget.RecyclerView;

public abstract class EndlessRecyclerOnScrollListener extends
RecyclerView.OnScrollListener {
public static String TAG = EndlessRecyclerOnScrollListener.class
.getSimpleName();

private int previousTotal = 0;
private boolean loading = true;
private int visibleThreshold = 5;
int firstVisibleItem, visibleItemCount, totalItemCount;

private int current_page = 1;

private LinearLayoutManager mLinearLayoutManager;

public EndlessRecyclerOnScrollListener(
LinearLayoutManager linearLayoutManager) {
this.mLinearLayoutManager = linearLayoutManager;
}

@Override
public void onScrolled(RecyclerView recyclerView, int dx, int dy) {
super.onScrolled(recyclerView, dx, dy);

visibleItemCount = recyclerView.getChildCount();
totalItemCount = mLinearLayoutManager.getItemCount();
firstVisibleItem = mLinearLayoutManager.findFirstVisibleItemPosition();

if (loading) {
if (totalItemCount > previousTotal) {
loading = false;
previousTotal = totalItemCount;
}
}
if (!loading
&& (totalItemCount - visibleItemCount) <= (firstVisibleItem + visibleThreshold)) {
// End has been reached

// Do something
current_page++;

onLoadMore(current_page);

loading = true;
}
}

public abstract void onLoadMore(int current_page);
}

Step: 4
======
Now create an adapter for the RecyclerView

CardViewDataAdapter.java


1
2
3
4
5
6
7
8
9
10
11
12
13
14
15
16
17
18
19
20
21
22
23
24
25
26
27
28
29
30
31
32
33
34
35
36
37
38
39
40
41
42
43
44
45
46
47
48
49
50
51
52
53
54
55
56
57
58
59
60
61
62
63
64
65
66
67
68
69
70
71
72
73
74
75
76
77
78
79
80
81
82
83
84
85
86
87
88
89
90
package com.pratap.cardviews1;

import java.util.List;

import android.support.v7.widget.RecyclerView;
import android.util.Log;
import android.view.LayoutInflater;
import android.view.View;
import android.view.View.OnClickListener;
import android.view.ViewGroup;
import android.widget.CheckBox;
import android.widget.CompoundButton;
import android.widget.TextView;
import android.widget.Toast;
import android.widget.CompoundButton.OnCheckedChangeListener;

public class CardViewDataAdapter extends
RecyclerView.Adapter<CardViewDataAdapter.ViewHolder> {

private List<Student> stList;

public CardViewDataAdapter(List<Student> students) {
this.stList = students;

}

// Create new views
@Override
public CardViewDataAdapter.ViewHolder onCreateViewHolder(ViewGroup parent,
int viewType) {
// create a new view
View itemLayoutView = LayoutInflater.from(parent.getContext()).inflate(
R.layout.cardview_row, null);

// create ViewHolder

ViewHolder viewHolder = new ViewHolder(itemLayoutView);
return viewHolder;
}

@Override
public void onBindViewHolder(ViewHolder viewHolder, int position) {

viewHolder.tvName.setText(stList.get(position).getName());

viewHolder.tvEmailId.setText(stList.get(position).getEmailId());

viewHolder.singlestudent=stList.get(position);

}

// Return the size arraylist
@Override
public int getItemCount() {
return stList.size();
}

public static class ViewHolder extends RecyclerView.ViewHolder {

public TextView tvName;
public TextView tvEmailId;

public Student singlestudent;

public ViewHolder(View itemLayoutView) {
super(itemLayoutView);

tvName = (TextView) itemLayoutView.findViewById(R.id.tvName);

tvEmailId = (TextView) itemLayoutView.findViewById(R.id.tvEmailId);
// Onclick event for the row to show the data in toast
itemLayoutView.setOnClickListener(new OnClickListener() {

@Override
public void onClick(View v) {

Toast.makeText(
v.getContext(),
"Data : \n" + singlestudent.getName() + " \n"
+ singlestudent.getEmailId(),
Toast.LENGTH_SHORT).show();

}
});

}

}

}

cardview_row.xml


1
2
3
4
5
6
7
8
9
10
11
12
13
14
15
16
17
18
19
20
21
22
23
24
25
26
27
28
29
30
31
32
33
34
<?xml version="1.0" encoding="utf-8"?>
<android.support.v7.widget.CardView xmlns:android="http://schemas.android.com/apk/res/android"
xmlns:card_view="http://schemas.android.com/apk/res-auto"
android:layout_width="match_parent"
android:layout_height="wrap_content"
android:orientation="horizontal"
card_view:cardCornerRadius="5dp"
card_view:cardUseCompatPadding="true" >

<RelativeLayout
android:layout_width="match_parent"
android:layout_height="wrap_content"
android:layout_margin="5dp" >

<TextView
android:id="@+id/tvName"
android:layout_width="match_parent"
android:layout_height="wrap_content"
android:layout_alignParentTop="true"
android:text="name"
android:textColor="@android:color/black"
android:textSize="18sp" />

<TextView
android:id="@+id/tvEmailId"
android:layout_width="match_parent"
android:layout_height="wrap_content"
android:layout_below="@id/tvName"
android:text="email"
android:textColor="@android:color/black"
android:textSize="18sp" />
</RelativeLayout>

</android.support.v7.widget.CardView>


Student.java 

1
2
3
4
5
6
7
8
9
10
11
12
13
14
15
16
17
18
19
20
21
22
23
24
25
26
27
28
29
30
31
32
33
34
35
36
37
38
39
40
41
42
43
44
45
46
47
48
49
50
51
52
53
54
55
56
57
58
59
60
package com.pratap.cardviews1;

import java.io.Serializable;

public class Student implements Serializable {

/**
*
*/
private static final long serialVersionUID = 1L;

private String name;

private String emailId;

private boolean isSelected;

public Student() {

}

public Student(String name, String emailId) {

this.name = name;
this.emailId = emailId;

}

public Student(String name, String emailId, boolean isSelected) {

this.name = name;
this.emailId = emailId;
this.isSelected = isSelected;
}

public String getName() {
return name;
}

public void setName(String name) {
this.name = name;
}

public String getEmailId() {
return emailId;
}

public void setEmailId(String emailId) {
this.emailId = emailId;
}

public boolean isSelected() {
return isSelected;
}

public void setSelected(boolean isSelected) {
this.isSelected = isSelected;
}

}

ScreenShots:
=========


Source Code 
=========

Download Link