- Download and Install the contacts+message backup app from the Store. Store link and QR can be found at the end of this post.
- When installed, go to Settings and scroll to the end of the list and selectcontacts+message backup.
- Tap on agree to accept the license terms.
- Tap on backup, select the items to backup viz contacts, SMS and MMS and finally tap on backup again to start the backup process.
 b
b - The backup process will start and the progress can be seen towards the bottom of the screen.
The backups are saved to the backup+restore folder on the SD card. Contacts are stored as a single vcf file while SMS are stored as a xml file.Restoring Backed Up Contacts, SMS And MMS
You can restore the backups to the same Windows Phone device on which the backup was made or on any other Windows Phone device which supports an SD Card. Here’s how to do that.- Install the contacts+message backup app if not already installed.
- Insert the SD card or Transfer the backup+restore folder to the SD card of the Windows Phone on which the contents are to be restored.
- Go to Settings> contacts+message backup and choose restore.

- Tick the items to restore and then select the restoration point that should be used for restoring the contents (if there are more than 1 backups stored to the SD card).
- Tap on restore to begin the restoration process
Showing posts with label Windows. Show all posts
Showing posts with label Windows. Show all posts
Wednesday, July 6, 2016
How To Backup Contacts & SMS To SD Card In Windows?


Saturday, March 26, 2016
This $99 device turns your smartphone into a 3D printer

This $99 3D printer can be used with any iOS, Android or Windows smartphone
A new 3D printer, OLO that made its debut in New York in October 2015 and won the
World Maker Faire Editor’s Choice Award, has finally found its way onto Kickstarter crowdfunding campaign where it has garnered more than $800,000 in four days. The first-ever smartphone 3D printer uses light from a smartphone display to create objects.
OLO works with virtually any smartphone (max 5.8-inch screen) and offers companion apps for Android, iOS and Windows. The device is battery-operated and it is completely portable. It weighs nearly 780 grams (1.7lb) and measures 17.2 x 11.5 x 14.8 cm (6.8 x 4.5 x 5.8 inches).
The printer consists of three main parts — a reservoir, a special photopolymer resin that you pour into it, and a mechanized lid that contains the build plate and control electronics. At the bottom of the reservoir, there’s a piece of polarized glass which you place your phone underneath, facing upward.
Then comes the printing part, which Drew Prindle explains over at Digital Trends:
“Basically, once you place the lid on top and the printer starts going, the app makes your phone’s screen light up with a specific pattern. The polarised glass then takes all this light (which shines outwardly to give your phone a wider viewing angle) and redirects it so that all the photons are travelling straight upward.
So as your phone’s screen beams light up into the reservoir, the directed light causes a layer of resin to harden onto the build plate, which slowly moves upward as each new layer is created.”
It’s basically a tiny DLP printer that uses your phone’s screen instead of a projector, which is absolutely brilliant, because doing so replaces the single most expensive part of a stereo lithography printer with something cheap and very common.
OLO 3D Inc. says users can select objects to print from its own library, grab designs from the Internet or use any 3D app including 3D scanning to make your own. There are different resins for different jobs and you can even print multiple items simultaneously. Given its small footprint, you will of course be limited to how large of items the 3D printer can turn out.
Currently, OLO is offering its 3D printer to early buyers for $99. First shipments of the OLO are expected to start in September 2016.
Thursday, February 25, 2016
How to Use Windows’ File History to Back Up Your Data

File History is Windows 10’s main backup tool, originally introduced in Windows 8. Despite the name, File History isn’t just a way to restore previous versions of files–it’s a fully-featured backup tool.
After you set up File History, you can just connect an external drive to your computer and Windows will automatically back up your files to it. Leave it connected and Windows will back up automatically on a schedule.
How to Enable File History
Click or tap the “Add a drive” option under Back up using File History to add an external drive that File History will back up to. It’ll list external drives and give you the option to back up to them.File History is designed to be quick and easy to enable, unlike other complex backup tools. To enable it, first connect an external hard drive to your computer. Next, open the Settings app from your Start menu. Navigate to Update & Security > Backup.
You could also use the Control Panel for this, but we’ll be covering the new Settings interface here. If you’d like to use the Control Panel instead (for example, if you’re still on Windows 8), open the Control Panel and navigate to System and Security > File History.

Select a drive, and Windows will use it for File History. The “Automatically back up my files” option will appear and be automatically turned on. Windows will automatically back up your files to the drive whenever you connect it to your computer.

How to Configure File History
Select “More options” to configure how often File History backs up, how long it keeps those backup copies, and–most importantly–which files it backs up.
File History automatically backs up your files every hour by default, but you can select a different time here. You can choose once every 10 minutes, 15 minutes, 20 minutes, 30 minutes, 1 hour, 3 hours, 6 hours, 12 hours, or once per day.
It will normally keep your backups forever, but you can have it delete them when they become one month, 3 months, 6 months, 9 months, 1 year, or 2 years old. You can also have File History automatically delete backups as necessary to make space on your File History drive.

By default, File History will be set to back up back up important folders in your user account’s home folder. This includes the Desktop, Documents, Downloads, Music, Pictures, Videos folders. It also includes the Roaming folder where many programs store application data, your OneDrive folder, and other folders.
You can check the full list of folders in this window, and add more folders. Select “Add a folder” and you’ll be able to choose any folder on your computer to back up. You can also select a folder here and use the “Remove” button to prevent Windows from backing it up.
NOTE: In Windows 8, you do not have the option to add folders from File History–instead, you must add folders to a Library in order for them to be included.

You’ll also find an “Exclude these folders” section that allows you to exclude specific subfolders from being backed up. For example, you could have Windows automatically back up every folder in your Documents folder, but ignore one particular folder. In Windows 8, you’ll find this on the left-hand side of the File History window.
To start backing up to a different drive, use the “Stop using drive” button. This allows you to stop backing up to your current drive and start backing up to a new one. The backups won’t be deleted, but Windows can only be configured to back up to one drive at once.

The “See advanced settings” link here takes you to the Control Panel, which offers another interface you can use to configure File History. Click “Advanced Settings” here and you’ll find a few more options, including the ability to view recent errors in the Event Viewer, clean up old versions of files, and allow other computers that are part of your homegroup to back up to your drive.

How to Restore Files from Your Backup
To restore files from your external drive, open the Settings app, select “Update & security,” select “Backup,” select “More options,” scroll down to the bottom of the window, and select “Restore files from a current backup.”
You can also open the Control Panel, select “System and Security,” select “File History,” and click “Restore personal files.”
(If you have File History backups you created on another computer, just set up File History on the new computer and select the drive containing your old File History backups. They’ll then appear in the Restore Files interface so you can restore files, just as you could if the backup was created on the current computer.)
This interface will allow you to view your backups and restore files. Browse the available files and select one or more files or folders. You can preview them by right-clicking them or select them and click the green button to restore them to your computer.
To choose a time period, click the arrow buttons or the panes at the side of the window. You’ll also be informed how many different backup time periods are available. For example, in the screenshot below, the “2 of 3” at the top of the window indicates there are three available backups, and we’re viewing the second one. There’s one older backup available, as well as one newer one.

How to Restore Files From Within File Explorer
You can also quickly restore a previous version of a file from File Explorer. Open File Explorer, right-click the file you want to revert, and click “Restore previous versions.” You can also click “Properties” and then select the “Previous Versions” tab.

Any available previous versions of the file from File History will be available here. You can preview them, restore one to its original location, or restore a previous version to a different location on your computer.

You can also view previous versions and deleted files that were in a specific folder. To do this, navigate to the folder in File Explorer, click the “Home” tab on the ribbon bar at the top of the window, and click “History.”

You’ll be presented with a list of files you can restore that were once in the folder. This is the same interface you’d use when restoring files normally, but File Explorer allows you to start from within a specific folder to speed things up.

File History is a very simple and useful backup option, and for it’s completely free. Windows 10 also allows you to create a system image backup if you want a full backup copy of your operating system state. This isn’t the ideal solution for backing up your files–even if you make system image backups, you should be creating more frequent backups of your important files with File History–but some geeks may find it useful if they’re playing with the Registry or other system files.
Monday, January 4, 2016
Ransom32 - The First Ransomware based on Javascript & Cross Platform Compatibility
A new Ransomware as a Service, or RaaS, called Ransom32 has been discovered that for the first time uses a ransomware written in Javascript. Located on an underground TOR site, the Ransom32 RaaS is a simple, but efficient, service where anyone can download and distribute their very own copy of the ransomware executable as long as they have a bitcoin address. For offering this service, the developers of Ransom32 take a 25% cut of all ransom payments and then forward the rest to the bitcoin address an affiliate entered when they joined the affiliate program.
The first Javascript Ransomware
What makes this ransomware unique is that it is the first ransomware programmed entirely in Javascript, HTML, and CSS. This ransomware uses the NW.js platform that allows developers to create native applications for Linux, Mac, and Windows using HTML5, CSS3, Javascript, and WebGL. Using NW.js a developer can take their scripts and html and package them into a Chromium executable that when executed automatically runs the embedded JS and HTML.What makes the Ransom32 RaaS so scary is that Javscript and HTML are cross-platform and run equally as well on Macs and Linux as they do in Windows. This means that with some minor tweaks, the Ransom32 developers could easily make NW.js packages for Linux and Mac computer. Though there does not seem to be any indication that this is being done as of yet, doing so would be trivial.
It is inevitable that ransomware will be created for operating systems other than Windows Using a platform like NW.js just brings us one steps closer.
First Glance:
Ransom32 was first reported by infected users Fabian Wosar of Emsisoft and Security Researcher xXToffeeXx searched for a sample they stumbled upon the Ransom32 TOR affiliate service. It is very easy for an affiliate to join this RaaS as all that is needed is a bitcoin address that the affiliate's share of the ransom payment will be sent to.

Once a bitcoin address is submitted, an affiliate will be shown an Affiliate Console where they can see the statistics for their personal distribution campaign and configure various settings on how the ransomware should be executed.

This affiliate console will contain statistics that include the number of people that successfully installed the client, the number of people that were shown the lock screen when the encryption was completed, the number of bitcoin transactions to your address, and the amount of ransom payments sent to your payout address.
In the console an affiliate will also be able to configure various settings for how the Ransom32 executable should run.
The listed settings and the Ransom32 developer's descriptions for them are:
BTC amount to ask: BTC amount to ask. Don't be too greedy or people will not pay.
Fully lock the computer: By default the lockscreen will popup each X seconds after being minimized. You can configure it so the user will not be able to minimize the lock screen. The downside is that will be more difficult for the users to check that their files were truly encrypted and also they will need to find another method to send your Bitcoins as the browser will be blocked too.
Low CPU Usage: Will encrypt files at 0-25% speed while the lock window is not shown, so the process won't be noticeable in the task manager by an advanced user because of high CPU consumption.
Show the lockscreen before encrypting: By default the client will show the lockscreen after encrypting part of the files in the computer (filesize under 50 Mb) and continue encrypting in the background. You can tell it to show the lockscreen right after installing, before encrypting any file in the background. The downside is that if the user tries to check his files just when the window pops in, he will notice that any file has been encrypted (although it is encrypting while is running).
Show a message Box: This box will be shown before installing and before any latent timeout is applied.
Latent Timeout: The client will "wake up", connect to the server and start encrypting after this amount of seconds passed after installing. The client won't connect to the server until it wakes up (more stealth), so you won't notice an install in your stats until this moment. NOTE: The client will not save the latent info as-is. Will be mixed with some data so is not understandable at first sight. Because of this, expect a 0-4 minutes drift to your timeout.

Once an affiliate has configured the ransomware to their liking, they simply need to click on the download button to generate and download their customized copy of Ransom32. This download is a self-extracting RAR file that weighs in at 22MB and when extracted totals over 67MB. Once the customized ransomware is downloaded, it is up to the affiliate to determine how it should be distributed.
An important feature for any "commerce" campaign is to be able to track its performance. As only a bitcoin address is required to join the affiliate program, it is very easy for an affiliate to track each distribution method's performance by simply using a different address for each campaign.
Encryption Process
The download that is generated by the affiliate is actually a 22MB self-extracting archive that when extracted is over 67MB. When this executable is run, it will extract numerous files into the C:\Users\User\AppData\Roaming\Chrome Browser folder and creates a shortcut in the Start Menu's Startup Folder called ChromeService so that the ransomware starts at login. The shortcut points to a chrome.exe executable that is actually a NW.js package that contains Javascript code that will encrypt the victim's data and then display a ransom note.The files extracted into the Chome Browser folder are:
- chrome - The Chromium license agreement.
- chrome.exe - This is the main executable for the malware and is a packaged NW.js application bundled with Chromium.
- ffmpegsumo.dll - HTML5 video decoder DLL that is bundled with Chromium.
- g - The settings file that contains various information used by the malware. This information includes the affiliate's ransom amount, bitcoin address that they receive payments on, and error message that is shown in a messagebox if the Show a message Box setting was enabled.
- icudtl.dat - File used by Chromium
- locales - Folder containing various language packs used by Chrome.
- msgbox.vbs - The messagebox displayed if the affiliate enabled the Show a message Box setting.
- nw.pak - Required for the NW.JS platform.
- rundll32.exe - Renamed TOR executable so that the malware can communicate with the TOR Command and Control server.
- s.exe - Renamed Shortcut.exe from OptimumX. This is a legitimate program used by the malware to create the ChromeService shortcut in the Startup folder.
- u.vbs - A VBS script that deletes a specified folder and its contents.

At glance it looks suspiciously like a copy of the famous browser "Chrome". The forgery is revealed only in that it does not have a digital signature and version information is missing. Further analysis they expose as a packed NW.js application.
When encrypting your data, Ransom32 will target only specific file extensions and encrypt them using AES encryption. The targeted file extensions are:
* .jpg, * .jpeg, * .raw, * .tif, * .gif, * .png, * .bmp, * .3dm, * .max, * .accdb, * .db, * .dbf, *. mdb, * .pdb, * .sql, *. * SAV *, *. * SPV *, *. * grle *, *. * MLX *, *. * SV5 *, *. * game *, *. * Slot *, * .dwg, * .dxf, * .c, * .cpp, * .cs, * .h, * .php, * .asp, * .rb, * .java, * .jar, * .class, * .aaf, * .aep, * .aepx, * .PLB, * .prel, * .prproj, * .aet, * .ppj, * .psd, * .indd, * .indl, * .indt, *. indb, * .inx, * .idml, * .pmd, * .xqx, * .xqx, * .ai, * .eps, * .ps, * .svg, * .swf, * .fla, * .as3, * .as, * .txt, * .doc, * .dot, * .docx, * .docm, * .dotx, * .dotm, * .docb, * .rtf, * .wpd, .wps, *. msg, * .pdf, * .xls, * .xlt, * .xlm, * .xlsx, * .xlsm, * .xltx, * .xltm, * .xlsb, * .xla, * .xlam, * .xll, * .xlw, * .ppt, * .pot, * .pps, * .pptx, * .pptm, * .potx, * .potm, * .ppam, * .ppsx, * .ppsm, * .sldx, *. sldm, * .wav, * .mp3, * .aif, * .iff, * .m3u, * .m4u, * .mid, * .mpa, * .wma, * .ra, * .avi, * .mov, * .mp4, * .3gp, * .mpeg, * .3g2, * .asf, * .asx, * .flv, * .mpg, * .wmv, * .vob, * .m3u8, * .csv, *. EFX, * .sdf, * .vcf, * .xml, * .ses, * .dat
Notice how Ransom32 also uses wild cards in the targeted file extensions. This allows the program to to target a greater variety of extensions. For example, with the .*sav* extension, not only will .sav files be targeted, but also files ending with .save, .gamesave, or .mysaves will be encrypted as well. When encrypting data files, it does not rename a victim's files and will not encrypt any files located in the following folders:
- : \ Windows \
- : \ winnt \
- ProgramData \
- boat\
- temp \
- tmp \
- $ RECYCLE.BIN \
When it has finished encrypting your data it will display the Ransom32 ransom lock screen/ransom note as shown below.

The Ransom32 lock screen will display information that tells the victim what has happened to their files, how to pay the ransom, the ransom amount, and the bitcoin address a ransom payment is sent to. The language used by the lock screen is shown in either English or Spanish, with the default appearing to be English. Last, but not least, this screen allows you to decrypt one file for free to prove that it can be done.
Encryption is performed under the AES (Advanced Encryption Standard) 128-bit key with the CTR mode. For each file, a new key is created. This in turn with the RSA algorithm and a public key encrypted, which was retrieved in the first communication with the C2 server.

Extract from the individual protocol exchange between Ransom32 and the C2 server to Bitcoin address (violet) and retrieve public keys (length in yellow, key in green).
The malware also offers to decrypt a single file again to prove the victim that the malware developer encryption can actually pick up again. For this purpose it sends the encrypted AES key of the selected file to the C2 server, which then sends back the decrypted AES key for the file.
Files installed by Ransom32:
%Temp%\nw3932_17475
%AppData%\Microsoft\Windows\Start Menu\Programs\Startup\ChromeService.lnk
%AppData%\Chrome Browser\
%AppData%\Chrome Browser\.chrome\
%AppData%\Chrome Browser\.chrome\cached-certs
%AppData%\Chrome Browser\.chrome\cached-microdesc-consensus
%AppData%\Chrome Browser\.chrome\cached-microdescs
%AppData%\Chrome Browser\.chrome\cached-microdescs.new
%AppData%\Chrome Browser\.chrome\lock
%AppData%\Chrome Browser\.chrome\state
%AppData%\Chrome Browser\chrome
%AppData%\Chrome Browser\chrome.exe
%AppData%\Chrome Browser\ffmpegsumo.dll
%AppData%\Chrome Browser\g
%AppData%\Chrome Browser\icudtl.dat
%AppData%\Chrome Browser\locales\
%AppData%\Chrome Browser\msgbox.vbs
%AppData%\Chrome Browser\n.l
%AppData%\Chrome Browser\n.q
%AppData%\Chrome Browser\nw.pak
%AppData%\Chrome Browser\rundll32.exe
%AppData%\Chrome Browser\s.exe
%AppData%\Chrome Browser\u.vbs
Unfortunately, at this time there is no known way to decrypt the files for free, but if anything changes we will post about it here.
Source: Emsisoft & BleepingComputer
Monday, December 7, 2015
[Latest] Microsoft Silently Re-Enables Windows 10 Upgrades on Windows 7 and 8.1 PCs

Microsoft's getting ready for the more aggressive upgrade phase of Windows 10 – when the new OS will show up first as optional, and then as recommended download in Windows Update – so the company has recently made some changes to Windows 7 and 8.1 PCs to make sure that more computers get it.
Basically, settings on PCs that were previously configured not to receive the upgrade to Windows 10 have been reset and it appears that one of the updates that Microsoft deployed on Windows 7 and 8.1 PCs keeps checking every day to make sure that no other changes are made to this behavior.
Update being re-offered several times
The information comes from the creator of GWX Control Panel, an application developed to block the upgrade to Windows 10.
"Over Thanksgiving weekend I started getting reports that the Windows Update 'AllowOSUpgrade' setting was getting flipped back on on a number of peoples' PCs, and it keeps re-setting itself at least once a day if they switch it back off," Josh Mayfield was quoted.
In other words Windows 7 and 8.1 computers can now easily receive the upgrade to Windows 10 and for the moment, there doesn't seem to be any other way to stop this from happening than to manually refuse the new OS.
It's all being made through recently-shipped Windows updates for older versions, and according to Mayfield, the very same update is being re-offered again and again.
"Microsoft has released this update several times," Mayfield continued. "It doesn't change the name of the update, but every version is new, with new binary files."
Starting in early 2016, seeing Windows 10 in Windows Update will be quite normal, as Microsoft changes its strategy and makes it an optional update for everyone. At a later time, the upgrade will become “recommended update,” so it becomes harder to avoid installing Windows 10 if you really wish to keep your computer fully patched.
Also See:
Tuesday, November 17, 2015
Bypass Windows Bitlocker Disk Encryption In A Few Seconds

The researcher has discovered a method to access the cached password and modify it. In this way the attacker is able to bypass the full-disk encryption feature.
First, the attacker sets up a mock domain controller with the same name as the one the laptop is supposed to connect to. He then creates the same user account on the controller as on the laptop and creates a password for it with a creation date far in the past.
When authentication is attempted with the attacker’s password on the laptop, the domain controller will inform Windows that the password has expired and the user will automatically be prompted to change it. This happens before verifying that the machine is also registered on the controller.
At this point the attacker will have the ability to create a new password on the laptop, which will replace the original one in the local credentials cache.
Also See:Charge your smartphone to 50% in just five minutes
Logging in while connected to the rogue domain controller would still fail, because the controller does not have the machine password. However, the attacker could disconnect the laptop from the network in order to force a fallback to local authentication, which will now succeed because only the user password is verified against the cache.
This is a logic flaw that has been in the authentication protocol since Windows 2000, the researcher said. However, physical access did not used to be part of the Windows threat model, because in such a situation an attacker could boot from an alternative source, like a live Linux CD to access to the data anyway.
That all changed when BitLocker was introduced in Windows Vista. Microsoft’s full-disk encryption technology, which is available in the professional and enterprise editions of Windows, is specifically designed to protect data in case a computer is stolen or lost—in other words when an unauthorized individual has physical access to it.
BitLocker stores the data encryption key in a Trusted Platform Module (TPM), a secure hardware component that performs cryptographic operations. The key is unsealed from the TPM only if the same boot process is followed as when BitLocker was first activated.
The various stages of the boot process are cryptographically verified, so an attacker with physical access to a BitLocker-enabled laptop will not be able to boot from an alternative OS to read the data stored on its drive. The only possibility left for the attacker in this case is to boot normally to unlock the encryption key and then to bypass the Windows authentication to gain access to the data, which Haken’s attack allows.
Microsoft fixed the vulnerability Tuesday and published the corresponding MS15-122 security bulletin.
This attack shows that when it comes to security, we constantly need to reexamine old truths, Haken said.
BitLocker offers the option to enable preboot authentication using a PIN or a USB drive with a special key on it, in addition to the TPM. However, such configurations are a hard sell for enterprises, because they introduce friction for users and make it difficult for administrators to remotely manage computers, Haken said.
In its own documentation, Microsoft admits that preboot authentication is “unacceptable in the modern IT world, where users expect their devices to turn on instantly and IT requires PCs to be constantly connected to the network.”
Also See:Large-Scale DDOS Attacks on TOR Exit Nodes
Saturday, October 17, 2015
How to Remain Secure Against The NSA Data Decryption Attack.
Researchers Alex Halderman and Nadia Heninger presented a research stating that how NSA Exploits Flaws to Decrypt Huge Amounts of Communications Instead of Securing the Internet. The NSA can decrypt a huge amount of HTTPS, SSH, and VPN connections by means of the Diffie-Hellman key exchange algorithm with 1024-bit primes. Researchers Alex Halderman and Nadia Heninger were also a part of a research group that published a study of the Logjam attack, which took advantage of neglected and obsolete code to impose downgraded, 512-bit parameters for Diffie-Hellman.
While major browser vendors such as Internet Explorer, Chrome, and Firefox have already removed support for 512-bit Diffie-Hellman but however, the 1024-bit Diffie-Hellman is still supported despite being vulnerable to NSA surveillance.
Here's some tips on how to protect yourself from the NSA Data Decryption Attacks.
Web Browser
Always have a look at the Encryption Algorithms & make sure you're using the strongest crypto, that your browser supports. There's an excellent tool, How's My SSL?, that will to test your browser's cipher suite support. The relevant area of the page is the bottom, Given Cipher Suites. You want to make sure that you don't see the text "_DHE_" in the list of ciphersuites - although the Elliptic Curve variant of Diffie-Hellman, represented by suites with "_ECDHE_" is okay. It is important to note that there is a trade-off here: removing your clients support for "_DHE_" ciphers will eliminate the risk of this attack, but it may also removeForward Secrecy support altogether for some sites. Here's how to remove those "_DHE_" cipher suites if you still have them:
Firefox
(tested with 40.0.3)
Open a new tab, enter "about:config" into the location bar and hit the "Enter" key. If you get a warning page, click "I'll be careful, I promise!" This will bring you to the Firefox configuration settings. In the search bar up top, type ".dhe_" and hit the "Enter" key. This should result in two settings being displayed: "security.ssl3.dhe_rsa_aes_128_sha" and "security.ssl3.dhe_rsa_aes_256_sha". Double-click both of them to change the value from "true" to "false".
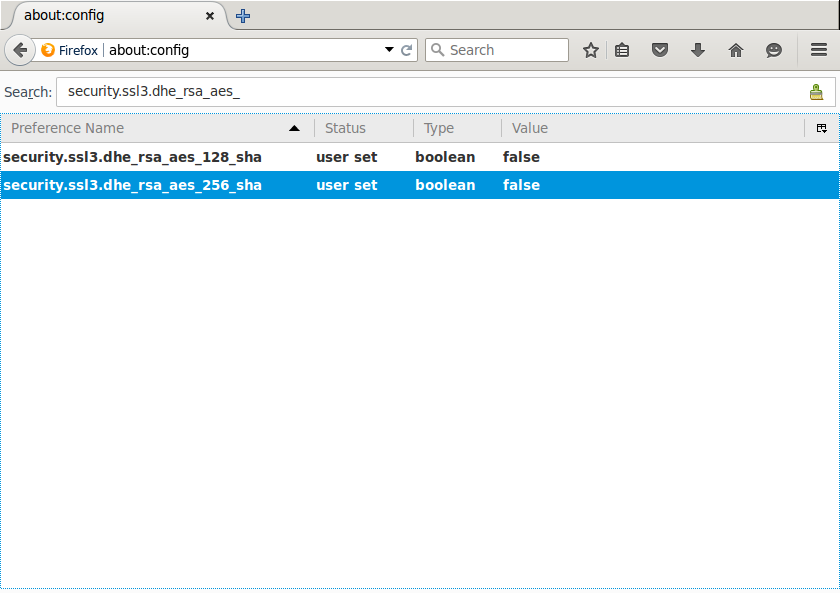
Now, if you refresh the How's My SSL page, the "_DHE_" ciphersuites should be gone!
Chrome
After following these steps in the following operating systems, refresh the How's My SSL page, the "_DHE_" ciphersuites should be gone. Note that the hex values for the blacklist correspond to the TLS Cipher Suite Registry
OSX
(tested with 46.0.2490.71, OSX 10.10.5)
Open "automator" and double-click "Run Shell Script". Replace the "cat" command with the following:
/Applications/Google\ Chrome.app/Contents/MacOS/Google\ Chrome --cipher-suite-blacklist=0x0033,0x0039,0x009E,0xcc15
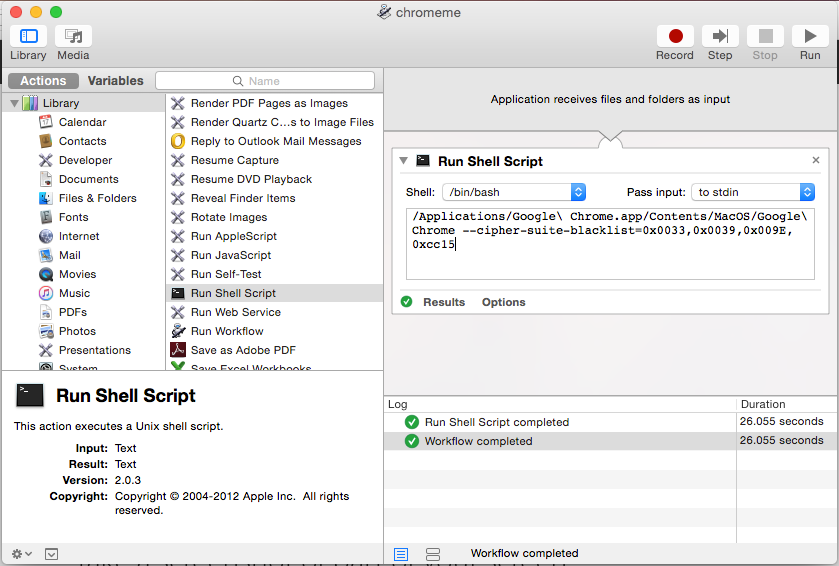
Save the application to your applications folder with whatever filename you like. In finder, you can drag the application to your dock and use that to launch Chrome without the vulnerable ciphers.
Windows
(tested with 46.0.2490.71, Windows 7)
Right-click the shortcut to your Chrome application, click "properties" and then add the following to the end of the "target": "--cipher-suite-blacklist=0x0033,0x0039,0x009E,0xcc15"
The target then should be similar to the following:
"C:\Program Files (x86)\Google\Chrome\Application\chrome.exe" --cipher-suite-blacklist=0x0033,0x0039,0x009E,0xcc15
From now on, open Chrome from this shortcut.
Linux
Tested with 46.0.2490.13, Ubuntu 14.04 LTS
Starting chrome from the command line with the following flag removes the undesired ciphers:
google-chrome --cipher-suite-blacklist=0x0033,0x0039,0x009E,0xcc15
SSH
An excellent guide for hardening your SSH configuration was released after revelations that the NSA can sometimes decrypt SSH connections. The guide is available here.
VPN
OpenVPN
Most VPN software supports the ".ovpn" file extension used by OpenVPN. Many VPN providers will also provide ".ovpn" files to connect using OpenVPN. You can query your OpenVPN client for the ciphers it supports with the following command:
openvpn --show-tls
This list should be ordered by strongest ciphers first. Recent versions of OpenVPN will have "ECDHE" support, but in order to connect your VPN provider has to support the desired cipher as well. Ciphers with just "DHE" can be vulnerable, however OpenVPN often has VPN servers generate their own primes, which mitigates the risk of the precompute attack. Edit your ".ovpn" file with a line containing the strongest ciphers and testing it against your VPN provider to see if it connects properly:
tls-cipher [cipher-1]:[cipher-2]:[cipher-3]
If it does not connect with strong ciphers, contact your VPN provider and request they update their servers to support the strongest ciphers available.
Subscribe to:
Posts (Atom)