Showing posts with label Tips. Show all posts

Thursday, October 16, 2014

How to transfer files between android devices and PC

Obviously the best way to transfer files between PC and any mobile devices is to connect it with data cable and use media storage as the connection mode.

But now a days every smart devices are coming equipped with wifi module and we can use this option to transfer any file between android devices, between android device and PC or between PCs.

You can find many methods to transfer files over wifi but all methods require both the android device and the PC to be on same wifi network. If they are not on the same wifi network then you need to upload the files to some cloud storage eg drop box, skydrive and then access them on the PC and download from there. It will cost you on data usage for larger files.

The best way which I found is to use Samba File sharing app. Only limitation with the app is that it only works on Rooted Phone.

Step by Step procedure to setup the Samba File Sharing app to share files between PC and android device using Wifi tethering is described below.

  1. Connect your Phone to PC using android Wi-Fi Hotspot.
  2. Install Samba File sharing app from play store. (Root the phone if not already rooted. Rooting has other added advantages and procedure is easy.)
  3. Configure Samba file sharing app.

How to configure Samba File Sharing app to share files between Phone and PC

Step 1: When you run the application for the first time, you will get Superuser request which you need to grant in order to run the application.
You can check your phone for Root access using Root Checker.

Step 2: Open the app menu and select Settings to open Samba File sharing settings. Please do not enable the service without configuring the app.

Step 3: In Samba Filesharing settings, configure the username and password that you will use to access the Android storages. You can skip the Workgroup Name and NETBIOS Name settings as it is not mandatory.


Step 4: After configuring all these parameters, return to the Samba Filesharing home screen and enable the service from the menu. After you enable the service, the app will pop up following message on the screen to manually start Wifi tethering.

 Step 5: Press OK, then the app will give you IP of the phone on the app home screen.

Step 6: Open Windows Run Box (Windows+R). On the Run Box type the IP address displayed on the phone along with the two prefixed backslashes and press enter.

 Step 7: If everything went fine, you will see a security window asking for the network credentials. Use the login credentials you configured on the Samba Filesharing app on Android and press enter.

That’s all, you will be able to access your Android storage on your computer over the Wi-Fi which is not a part of any network, so your privacy is protected. You can use the access to read, modify and delete the SD card content directly from your Computer. One of the best advantage of using the app is that you can see both internal SD card(sdcard in picture) as well as external SD card(share2 in picture) in one place.


Friday, October 10, 2014

How to share your android mobile internet with PC

Android Phone has three different methods to share its mobile internet with PC.
  1. USB tethering : This is most easy method to share internet with your PC. Just connect your phone to PC through USB cable and start USB tethering. Goto Settings > Wireless & networks > More... > Tethering & Portable Hotspot > USB tethering. PC will automatically configure itself to use the internet from phone's modem.
  2. Bluetooth tethering : This methods should be our last option to use the internet on PC as its data transfer speed is very low.
  3. Wi-Fi Hotspot : This method can only be used if both the devices are wifi enabled. If your PC don't have wifi module, you can use external Wireless Adapter .


    How to setup WiFi Hotspot on your android mobile


    1. Goto  Settings > Wireless & networks > More... > Tethering & Portable Hotspot > Wi-Fi Hotspot
    2. Click on Setup Wi-Fi Hotspot
    3. It will ask for Network SSID. Give any name which you like. It just used to identify your device when you connect your phone to PC. 

    Select WPA2 PSK for security mode and provide suitable password to prevent any unauthorized access of your phone. Click Save to save the settings.

    • Before starting Wi-Fi hotspot, switch ON Wifi module in PC.
    • Then switch ON Wi-Fi hotspot. Computer will automatically scan and display your network SSID which you provided while setting Wi-fi hotspot as shown in below picture.

    Wednesday, October 8, 2014

    How to configure Outlook for Zimbra account


    These Instruction are successfully tested in Outlook 2013. These settings will not work in network computers which uses proxy servers to connect to the internet.

    Add New Account

    If this is the first time Outlook has been used, you will be asked if you would like to set up an account. Select Yes and click Next. Otherwise, go to Account Settings.
    • Outlook 2007: Open the Tools menu and click Account Settings...
    • Outlook 2013: Go to the File tab, select Info if it is not already selected, and click Add Account.

    Auto Account Setup

    Choose Manual setup or additional server types and click Next.

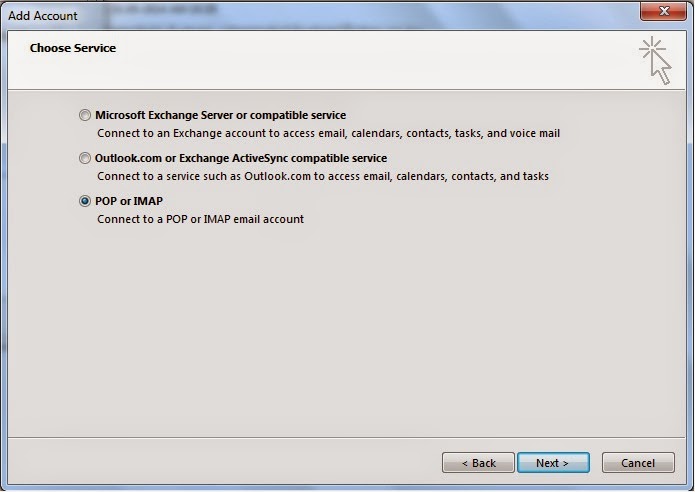
    Add Account


    Choose Service

    Choose POP or IMAP and click Next.


    Choose service


    Internet Email Settings


    POP/IMAP

    Your Name: Your real name used in your Email Account.
    E-mail Address: Your email address for this account.
    Incoming mail server: This is the internet location name of your incoming mail server.
    Outgoing mail server (SMTP): This is the internet location name of your outgoing mail server.
    User Name: This is the login name for your email account.
    Password: Enter your password if you want Outlook to remember it for you. Remember Password must be checked for you to enter your password.
    Remember Password: You may choose to save your password to avoid entering it every time you check your email.
    Require logon using Secure Password Authentication (SPA): Make sure this is turned on.


    More Settings...
    To set up a secure connection click this button to continue.

    Outgoing Server


    Outgoing Server
    My outgoing server (SMTP) requires authentication: Be sure to turn this on.

    Use same settings as my incoming mail server: This tab should be selected.

    Advanced


    Incoming server (IMAP): This value should be 993.
    Use the following type of encrypted connection: Use "SSL" encryption.
    Outgoing server (SMTP): Port 25 is default value selected by Outlook.
    Use the following type of encrypted connection: Use "TLS" encryption.
    Server Timeouts: The maximum value (10 minutes) works best for both on-campus and off-campus access.
    Root folder path: This is the mail folder location on your email account. Set to blank.

    Leave all other settings as default and press OK.

    Test Account Settings


    Click Test Account Settings... once you have made all necessary configurations. If you did not tell Outlook to remember your password, you will be prompted to enter it now.

    If everything is correct, you should see a screen like the one below. Close the Test Account Settings window, then click Next to finish the setup process. If the test fails, recheck the configuration settings and try again.


    Test


    The test has been done on Outlook 2013. Basic settings are same in case of lower version of Outlook too. You can try with your own Outlook versions.


    Sunday, October 5, 2014

    Troubleshooting Iberry smartphone facebook problem..

    I have been asked by many that their iberry device has pre-installed Facebook app but they are unable to use it. When they try to open the app, it open for some time and closes instantly.
    When I purchased iberry Auxus Nuclea X (Black) smartphone, I also faced the same problem. I tried to find the solution for many days but remain unsuccessful until I found out that only solution is to root it. I have tried many rooting technique, only technique that worked for this phone is using Root Genius.

    Root genius is one click root tool designed to use with windows computer. It helps user to root their android device by one click.

    How to root using Root Genius

    Step1. Enable USB debugging. Goto Setting> Developers Option> USB debugging> tick

    USB Debugging

    Step2.  Download and install root genius application in your computer.

    Step3. Connect your android device (with USB cable) with USB Debugging enabled(Step1). Root genius will automatically detect you android device if you follow the above steps carefully.

    Step4.  Click on ‘Root Now’ button to root your connected device.

    Root Genius
    Step5. King user app will be installed on your device after some time.


    King User

    Step6. You can check in your app list whether ‘king user’ is installed or not. You can also check the rooting by using Root Checker.

    Step 7. If all goes well, your Facebook problem will be solved. You can check it out by opening Facebook app.

    Rooting has added benefit that it will be open for any app to be installed without restrictions like call recorders etc.

    Points to be noted before rooting.

    1.    Your warranty is void after rooting.
    2.    No data loss in the process. It is very safe.