Sunday, June 28, 2015

Zombie Hive Cheats

Unlimited Quantum Cube, Unlimited Super DNA, Drill Fully Upgraded.                                                                                                                                                                                                                                     Zombie Hive Cheats
Zombie Hive Cheatsclick on the image to see more screenshot

UPDATED ON JUNE 28, 2015

DESCRIPTION
 • Zombie Hive game save file
 • Unlimited Quantum Cube
 • Unlimited Super DNA
 • Drill Fully Upgraded
 • You can update the game after applied this cheat
 • Only work for rooted devices
 • Must be extracted using ES Explorer

TESTED AND WORKS ON
  • Zombie Hive v1.18
  • Cooper i7 phone and several devices.
  • Android 4.2.1 | 4.4.2 | 4.4.4

WARNING!!!
  • This will remove your current progress!
  • Backup your game data!

LET'S DO IT
  • Force stop game and clear data
  • Download game save file | at the bottom of this page
  • Extract using ES Explorer  to /data/data/ 
  • Run your game and enjoy

IMPORTANT!
  • How to force stop game and clear data
  • How to extract game save to /data/data/
  • How to get access to /data/data/
  • How to backup game data
  • How to check root on your device
  • How to find bestselling product  ads

Saturday, June 27, 2015

Sky Force 2014 v1.38 Cheat

Unlimited Stars, Shields, Guns, Missiles, Lasers, Mega-Bombs and Magnets Fully Upgraded.                                                                                                                                                                                                                                     Sky Force 2014 Cheats
Sky Force 2014 Cheatsclick on the image to see more screenshot

ONLY WORK FOR ROOTED DEVICES, GET ROOT!

DETAILS
 • Unlimited Stars
 • Shields, Guns, Missiles, Lasers, Mega-Bombs and Magnets Fully Upgraded
 • You can update the game after applied this cheat
 • Will work to newer version
 • Must be extracted using ES Explorer

TESTED AND WORKS ON
 • Android 4.4.4
 • Android 4.4.2
 • Android 4.2.1
 • Lollipop

WARNING!!!
 • This will remove your current progress!
 • Backup your game data!
 • Still Doubted...?, try on Bluestacks

LET'S DO IT
  • Force stop game and clear data
  • Download game save file | at the bottom of this page
  • Extract to /data/data/ 
  • Run your game and enjoy

HOW TO FORCE STOP GAME AND CLEAR DATA

HOW TO EXTRACT TO /data/data/ DRECTORY

IMPORTANT!
  • How to download game save file
  • How to to root your phones
  • How to get access to /data/data/
  • How to avoid fraud on AliExpress  ads
  • How to backup game data
  • How to check root on your device

Criminal Case Cheats

Unlimited Energy, Unlimited Coins, All Pets Unlocked, All Classic Shop Item Unlocked                                                                                                                                                            Criminal Case Cheats
Criminal Case Cheats

UPDATED ON MARCH 28, 2016
ONLY WORK FOR ROOTED DEVICES, GET ROOT!

YOU WILL GET
 • Unlimited Energy
 • Unlimited Coins
 • All Pets Unlocked
 • All Classic Shop Item Unlocked

DESCRIPTION
 • Criminal Case v2.8.1 game save file
 • Will work to newer version
 • You can update the game after applied this cheat
 • Must be extracted using ES Explorer

TESTED AND WORKS ON
  • Android 4.4.4
  • Android 4.4.2
  • Android 4.2.1
  • May work on Lollipop

WARNING!!!
  • This will remove your current progress!
  • Backup your game data!
Go to /data/data/ find com.prettysimple.criminalcaseandroid folder and copy to your backup location
  • Not sure..., try on Bluestacks

LET'S DO IT
  • Force stop game and clear data
  • Download game save file | big button between the ads
  • Extract to  /data/data/ 
  • Run your game and enjoy!

IMPORTANT!
  • How to to root your phones
  • How to force stop game and clear data
  • How to extract game save to /data/data/
  • Must-Have phone accessories  ads
  • How to get access to /data/data/
  • How to backup game data
  • How to check root on your device

Thursday, June 25, 2015

4.2 Features (5) - Truly night mode

Biasanya, ketika anda memilih mode gelap, tampilan yang berubah hanya isi, sedangkan action bar/app bar di bagian atas dan bar belah tetap berwarna biru abu. Ini membuat mode gelap tidak begitu gelap. Sekarang, ketika anda memilih mode gelap, segala bagian dalam aplikasi berubah warna untuk mengikuti tampilan mode gelap, sehingga anda lebih nyaman membaca di ruangan gelap.

mode biasa
mode gelap


Apakah versi BETA itu? Bagaimana cara mengunduhnya?
Lihat di halaman ini untuk penjelasannya.


When you activate the night mode, the action bar (the bar on the top) and the split-version handle color is still the default blue grey color. This makes the night mode not-so-night mode. Now, when the night mode is on, the action bar color and split handle color will become almost black. So you can read more comfortably in a dark room.

normal mode
night mode

What is BETA version? And how to download it?
Take a look at this page for the answers.

4.2 Features (4) - Sharing URL

Ketika anda membagikan ayat (terutama melalui facebook), versi Alkitab yang akan ditampilkan mungkin berbeda dengan yang anda ingin bagikan. Contohnya, ketika anda membagikan ayat dari NIV, link yang diklik oleh orang lain melihat ayat yang anda bagikan mungkin akan menampilkan versi KJV atau yang lain. Alasannya, karena facebook hanya menerima direct link ketika membagikan sesuatu, dan link itu akan menuju ke halaman web yang menampilkan teks Alkitab. Ini menjadi masalah jika halaman web tersebut tidak menyediakan versi Alkitab yang sama seperti yang ingin anda bagikan.

Sekarang, ketika anda membagikan ayat, aplikasi ini akan membuat link otomatis untuk menampilkan versi Alkitab yang sesuai, karena teks-nya akan disimpan di dalam server kami. Jadi ketika anda menyalin dan membagi ayat, aplikasi ini otomatis menambahkan link untuk melihat ayat tersebut di halaman web.

Namun, jika anda ingin mematikan link tersebut, anda bisa ke penggunaan > Salin dan bagikan > matikan "link bagi ayat".

tampilan web link bagi ayat
opsi URL bagi ayat

URL ini berbeda setiap kali anda menyalin/membagi ayat. Bahkan jika pengguna lain menyalin dari ayat yang sama, link URL akan berbeda. Jika anda ingin tahu berapa kali ayat yang anda bagikan dilihat, anda bisa membuka halaman URL tersebut dan pilih menu "View Source" dari browser, dan bisa melihat jumlah "viewCount".

Apakah versi BETA itu? Bagaimana cara mengunduhnya?
Lihat di halaman ini untuk penjelasannya.


When you share verses (especially to facebook) the Bible version might be different than what you actually want to share. For example, if you share a verse from NIV, the link generated will redirect your friends to a verse in KJV or other versions. The reason for this is because facebook can only accept direct link when sharing, and the link will redirect to another website that provides web-based Bible reading text. But this could be a problem if the website doesn't provide the same Bible version as what you share.

Now, when you share verses, the app will generate a link for sharing that shows the verse in the exact same version you are currently viewing, because the actual verse text will be stored in our server.
So when you copy or share verses, it will automatically include the link to open it in web-browser. If you don't like this, you can go to Setting > Copying and sharing > disable the option "Share URL".

web-view when opening the shared verse
Share URL option

The URL is unique every time you copy or share. Even if a different user copies or shares the exact same verse, the URL will still be different. If you share a verse URL and you want to see about how many times your verse has been viewed, you can open the page and select the View Source menu on your browser, you can see a 'viewCount' message somewhere there.

What is BETA version? And how to download it?
Take a look at this page for the answers.

4.2 Features (3) - Progress mark synchronization

Lebih banyak pengguna yang menunggu fitur sync untuk rencana baca, namun kami perlu pemanasan dahulu dengan mencoba membuat fitur sync untuk jejak. Seperti yang anda ketahui, sync rencana baca jauh lebih kompleks daripada sync jejak. Jangan kuatir, kami pasti mencoba membuat sync rencana baca, jadi mohon kesabarannya.

Jika anda tidak familiar dengan jejak: jejak adalah 5 buah pin warna-warni yang anda lihat ketika membuka menu drawer kiri. Anda dapat membaca panduan lengkap tentang jejak di halaman ini.

Jejak kini dapat di-sync.
Dalam kasus ketika anda memiliki jejak di 2 HP yang berbeda, dan anda mengubah salah satu jejak di HP "A", namun jejak di HP "B" belum mengikuti perubahan tersebut, waktu lokal di perangkat tersebut akan digunakan untuk menentukan perubahan yang akan disimpan.
Contohnya, di HP "A" anda mengubah nama jejak menjadi "hari Minggu". Satu menit kemudian, anda mengubah namanya lagi menjadi "tiap hari". Maka, tidak peduli HP mana yang selesai terhubung dengan server terlebih dahulu (bisa jadi HP "B" terhubung dengan server duluan daripada "A"), jejak anda di HP "A" dan "B" akan berubah nama menjadi "tiap hari".


Apakah versi BETA itu? Bagaimana cara mengunduhnya?
Lihat di halaman ini untuk penjelasannya.


Although people may be waiting for reading plan synchronization across devices more, I need to warm up my brain by doing progress mark synchronization first. As you may know, reading plan sync is way more complex than progress mark sync. Don't worry, we will definitely try doing the reading plan sync so please be patient with us.

If you are not familiar with progress marks, it is the colorful pins that you see when you open the left drawer. You can read the more detail explanation about progress mark in our web guide.

Progress marks can now be synced.
In case that you update one of the five progress marks from two devices, before one catches up with the other, the local time of the device will be used to determine which changes are saved eventually. So for example you disconnect your phone and tablet, then on your phone you change the Red progress mark title to "Sunday reading" and then a minute later on your phone you change the Red progress mark title to "Daily", then, no matter which device connects to the sync server first, eventually the Red progress mark title will be "Daily", because it is set later.

What is BETA version? And how to download it?
Take a look at this page for the answers.

4.2 Features (2) - Partially highlight a verse

Jujur saja, saya tidak menyangka jika banyak dari anda yang ingin fitur ini.  Akhirnya, di aplikasi Alkitab/Quick Bible 4.2 BETA 4, anda bisa memberi sorot sebagian.

Pilih satu ayat, tambahkan sorotan. Ayat yang terpilih tersebut kini muncul di dalam dialog sorotan, anda bisa geser kursor pemilihan untuk mengatur bagian mana yang akan diberi sorotan. Jangan lupa memilih warna sorotan, kalau tidak ayat yang sudah dipilih tidak akan muncul sorotannya.

menambah sorotan
memilih kata yang akan disorot

Meski begitu, sorot sebagian ada beberapa kelemahan. Salah satunya, sorot sebagian tidak muncul secara otomatis jika anda berpindah versi Alkitab. Maksudnya, setelah anda memberi sorot sebagian di versi TB, jika anda berpindah ke versi lain, contohnya ESV, sorot sebagian itu akan otomatis menjadi sorot penuh seperti biasa. Namun jika anda kembali ke versi TB, sorot sebagian itu muncul kembali. Mengapa demikian? Sebab sangat sulit menentukan karakter apa yang dipilih secara otomatis dalam berbagai bahasa. Selain itu, pilihan untuk sorot sebagian tidak akan muncul jika anda memilih lebih dari satu ayat sekaligus. Ada berbagai kemungkinan yang sulit untuk diantisipasi dalam membuat fitur ini.

Apakah versi BETA itu? Bagaimana cara mengunduhnya?
Lihat di halaman ini untuk penjelasannya.


I personally don't expect that many of you ask this feature. And finally, in Alkitab/Quick Bible 4.2 BETA 4, you can now able to highlight some parts of a verse.

Select a verse, and choose to add a highlight. The selected verse will be shown in the highlight color selection dialog, and you can drag the selection handle to modify the part of the verse that will be highlighted. Do not forget to choose the highlight color for that verse, otherwise the verse won't be highlighted.

adding a highlight
selecting words to highlight

However, as some of you might have guessed, the partial highlight only works for one specific Bible version at a time. For example, if you highlight the verse partially in KJV, when you switch to a different Bible version, you will see the highlight as a full-verse highlight. But if you go back to KJV again, your partial highlight will still be saved. Also, this partial highlight option will not appear when you select more than one verse at a time. These variety of possibilities were the most difficult part to think when making this feature.

What is BETA version? And how to download it?
Take a look at this page for the answers.

4.2 Features (1) - Custom background color

Saudara(i) di dalam Kristus,

Karena anugerah Tuhan, kami masih berkesempatan mengembangkan aplikasi ini. Kami juga berterima kasih kepada semua pihak yang mendukung, memberi donasi, dan berkontribusi menyumbangkan ide/saran kepada kami. Posting kali ini menjelaskan tentang fitur-fitur baru yang menarik di Alkitab/Quick Bible 4.2 BETA 4.

Ubah warna latar belakang untuk ayat yang dipilih

Beberapa dari pengguna menyebutkan bahwa warna pemilihan (biru terang) tidak terlalu jelas terlihat, lebih bagus warna sebelumnya (yaitu kuning oranye). Namun kami sudah tidak memakai warna kuning oranye dalam warna aplikasi Alkitab. Jadi, di versi 4.2 BETA 4, kami mengubah supaya warna pemilihan lebih jelas, dengan memakai warna biru yang lebih kental. Beberapa dari anda mungkin juga menyadari bahwa sudah tidak ada border disekeliling seleksi untuk memberikan tampilan yang lebih sederhana.
Namun jika anda masih menyukai warna kuning oranye, anda juga bisa mengaturnya sendiri. Buka pengaturan > tampilan > ubah "warna latar ayat terpilih".

warna pemilihan standar
warna pemilihan dapat diubah sesuai selera

Apakah versi BETA itu? Bagaimana cara mengunduhnya?
Lihat di halaman ini untuk penjelasannya.


Fellow brothers and sisters in Christ,

By the grace of God, we can still continue to develop this app. We also thank to all of you who support, donate, and spend your thought to give feedbacks to us. This entry-series will explain you about the new exciting features in Alkitab/Quick Bible 4.2 BETA 4.

Custom background color for selection

Some of you mentioned that the current selection color (which is light blue) is not outstanding enough, and you prefer the previous yellow-orange color. Problem is that we have omitted yellow/orange color scheme in our app. So in the version 4.2 BETA 4, we make the selection color more visible, by using more vivid blue color. Also, some of you may notice that we also get rid of the border around the selection so it has simpler look.
If you still prefer the yellow/orange color, you are able to customise it to match your own preference. Go to setting > Display > change the "Selected verse background".

default selection color
customised selection color

What is BETA version? And how to download it?
Take a look at this page for the answers.

Regarding Beta Versions

What is BETA version? 

"A version of a piece of software that is made available for testing, typically by a limited number of users outside the company that is developing it, before its general release." We need you to test it first and report bugs as many as possible before we publish the update widely on Google Play.

How to download the BETA versions?

  1. Join the bibleforandroid Google Group
  2. Go to Quick Bible Testing to enable testing beta versions. Click the "Become a Tester" button.
  3. Open Quick Bible on Play Store and you will get the update for Beta versions.

Bagaimana cara mengunduh versi beta?

  1. Gabung dengan Google Group bibleforandroid
  2. Kunjungi Alkitab Testing untuk mengaktifkan pengujian versi beta
  3. Buka Alkitab di Play Store


Wednesday, June 17, 2015

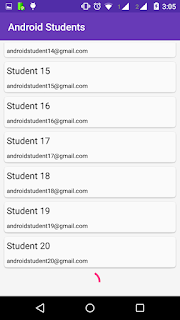
LoadMore RecyclerView with progress bar showing at bottom


Update to My Last Post.

I am trying to get Endless RecyclerView with progress bar showing at bottom when you are loading data from  web service. But faced different problems.
May be some one needs this.

My StackOverflow answer. Plesae upvote my answer. if it is helpful in your project.
http://stackoverflow.com/questions/31000964/how-to-implement-setonscrolllistener-in-recyclerview/31178493#31178493


I want to show complete example on this.


Step: 1
======
Create a new Interface


1
2
3
public interface OnLoadMoreListener {
void onLoadMore();
}

Step: 2
======
Create a new Model Object Name Student.java


1
2
3
4
5
6
7
8
9
10
11
12
13
14
15
16
17
18
19
20
21
22
23
24
25
26
27
28
29
30
31
32
33
34
35
36
37
38
package com.pratap.endlessrecyclerview;

import java.io.Serializable;

public class Student implements Serializable {

private static final long serialVersionUID = 1L;

private String name;

private String emailId;

public Student() {

}
public Student(String name, String emailId) {
this.name = name;
this.emailId = emailId;
}

public String getName() {
return name;
}

public void setName(String name) {
this.name = name;
}

public String getEmailId() {
return emailId;
}

public void setEmailId(String emailId) {
this.emailId = emailId;
}


}


Step: 3
======

Create a new Activity with Recyclerview in the Xml Layout.


1
2
3
4
5
6
7
8
9
10
11
12
13
14
15
16
17
18
19
20
21
22
23
24
25
26
27
28
29
30
31
32
33
34
35
36
37
38
39
40
41
42
43
44
45
46
47
48
49
50
51
52
53
54
55
56
57
58
59
60
61
62
63
64
65
66
67
68
69
70
71
72
73
74
75
76
77
78
79
80
81
82
83
84
85
86
87
88
89
90
91
92
93
94
95
96
97
98
99
100
101
102
103
104
105
106
107
108
109
110
111
112
113
114
115
116
package com.pratap.endlessrecyclerview;

import android.os.Bundle;
import android.os.Handler;
import android.support.v7.app.AppCompatActivity;
import android.support.v7.widget.LinearLayoutManager;
import android.support.v7.widget.RecyclerView;
import android.support.v7.widget.Toolbar;
import android.view.View;
import android.widget.TextView;

import java.util.ArrayList;
import java.util.List;

public class MainActivity extends AppCompatActivity {

private Toolbar toolbar;

private TextView tvEmptyView;
private RecyclerView mRecyclerView;
private DataAdapter mAdapter;
private LinearLayoutManager mLayoutManager;

private List<Student> studentList;


protected Handler handler;

@Override
protected void onCreate(Bundle savedInstanceState) {
super.onCreate(savedInstanceState);
setContentView(R.layout.activity_main);
toolbar = (Toolbar) findViewById(R.id.toolbar);
tvEmptyView = (TextView) findViewById(R.id.empty_view);
mRecyclerView = (RecyclerView) findViewById(R.id.my_recycler_view);
studentList = new ArrayList<Student>();
handler = new Handler();
if (toolbar != null) {
setSupportActionBar(toolbar);
getSupportActionBar().setTitle("Android Students");

}

loadData();

// use this setting to improve performance if you know that changes
// in content do not change the layout size of the RecyclerView
mRecyclerView.setHasFixedSize(true);

mLayoutManager = new LinearLayoutManager(this);

// use a linear layout manager
mRecyclerView.setLayoutManager(mLayoutManager);

// create an Object for Adapter
mAdapter = new DataAdapter(studentList, mRecyclerView);

// set the adapter object to the Recyclerview
mRecyclerView.setAdapter(mAdapter);
// mAdapter.notifyDataSetChanged();


if (studentList.isEmpty()) {
mRecyclerView.setVisibility(View.GONE);
tvEmptyView.setVisibility(View.VISIBLE);

} else {
mRecyclerView.setVisibility(View.VISIBLE);
tvEmptyView.setVisibility(View.GONE);
}

mAdapter.setOnLoadMoreListener(new OnLoadMoreListener() {
@Override
public void onLoadMore() {
//add null , so the adapter will check view_type and show progress bar at bottom
studentList.add(null);
mAdapter.notifyItemInserted(studentList.size() - 1);

handler.postDelayed(new Runnable() {
@Override
public void run() {
// remove progress item
studentList.remove(studentList.size() - 1);
mAdapter.notifyItemRemoved(studentList.size());
//add items one by one
int start = studentList.size();
int end = start + 20;

for (int i = start + 1; i <= end; i++) {
studentList.add(new Student("Student " + i, "AndroidStudent" + i + "@gmail.com"));
mAdapter.notifyItemInserted(studentList.size());
}
mAdapter.setLoaded();
//or you can add all at once but do not forget to call mAdapter.notifyDataSetChanged();
}
}, 2000);

}
});

}


// load initial data
private void loadData() {

for (int i = 1; i <= 20; i++) {
studentList.add(new Student("Student " + i, "androidstudent" + i + "@gmail.com"));

}


}


}


activity_main.xml

1
2
3
4
5
6
7
8
9
10
11
12
13
14
15
16
17
18
19
20
21
22
23
24
25
26
27
28
29
30
<?xml version="1.0" encoding="utf-8"?>
<LinearLayout xmlns:android="http://schemas.android.com/apk/res/android"
android:layout_width="match_parent"
android:layout_height="match_parent"
android:fitsSystemWindows="true"
android:orientation="vertical">

<include
android:id="@+id/toolbar"
layout="@layout/toolbar" />

<android.support.v7.widget.RecyclerView
android:id="@+id/my_recycler_view"
android:layout_width="match_parent"
android:layout_height="0dp"
android:layout_margin="5dp"
android:layout_weight="1"
android:scrollbars="vertical" />


<TextView
android:id="@+id/empty_view"
android:layout_width="match_parent"
android:layout_height="match_parent"
android:gravity="center"
android:text="No Records"
android:visibility="gone" />


</LinearLayout>


Create a row for recyclerview

list_row.xml


1
2
3
4
5
6
7
8
9
10
11
12
13
14
15
16
17
18
19
20
21
22
23
24
25
26
27
28
29
30
31
32
33
34
35
<?xml version="1.0" encoding="utf-8"?>
<android.support.v7.widget.CardView xmlns:android="http://schemas.android.com/apk/res/android"
xmlns:card_view="http://schemas.android.com/apk/res-auto"
android:layout_width="match_parent"
android:layout_height="wrap_content"
android:orientation="horizontal"
card_view:cardCornerRadius="5dp"
card_view:cardUseCompatPadding="true">

<RelativeLayout
android:layout_width="match_parent"
android:layout_height="match_parent"
android:background="?android:selectableItemBackground">

<TextView
android:id="@+id/tvName"
android:layout_width="match_parent"
android:layout_height="wrap_content"
android:layout_margin="5dp"
android:text="Name"
android:textColor="@android:color/black"
android:textSize="18sp" />

<TextView
android:id="@+id/tvEmailId"
android:layout_width="match_parent"
android:layout_height="wrap_content"
android:layout_below="@+id/tvName"
android:layout_margin="5dp"
android:text="Email Id"
android:textColor="@android:color/black"
android:textSize="12sp" />
</RelativeLayout>

</android.support.v7.widget.CardView>


create a progress bar to show at the bottom.

progressbar_item.xml


1
2
3
4
5
6
7
8
9
10
11
12
13
<?xml version="1.0" encoding="utf-8"?>
<LinearLayout xmlns:android="http://schemas.android.com/apk/res/android"
android:layout_width="match_parent"
android:layout_height="match_parent"
android:orientation="vertical" >

<ProgressBar
android:id="@+id/progressBar1"
android:layout_width="wrap_content"
android:layout_gravity="center_horizontal"
android:layout_height="wrap_content" />

</LinearLayout>


Step: 4
======

Create an Adapter Class for RecyclerView


1
2
3
4
5
6
7
8
9
10
11
12
13
14
15
16
17
18
19
20
21
22
23
24
25
26
27
28
29
30
31
32
33
34
35
36
37
38
39
40
41
42
43
44
45
46
47
48
49
50
51
52
53
54
55
56
57
58
59
60
61
62
63
64
65
66
67
68
69
70
71
72
73
74
75
76
77
78
79
80
81
82
83
84
85
86
87
88
89
90
91
92
93
94
95
96
97
98
99
100
101
102
103
104
105
106
107
108
109
110
111
112
113
114
115
116
117
118
119
120
121
122
123
124
125
126
127
128
129
130
131
132
133
134
135
136
137
138
139
140
141
142
143
144
145
146
147
148
149
150
151
152
package com.pratap.endlessrecyclerview;

import android.support.v7.widget.LinearLayoutManager;
import android.support.v7.widget.RecyclerView;
import android.view.LayoutInflater;
import android.view.View;
import android.view.View.OnClickListener;
import android.view.ViewGroup;
import android.widget.ProgressBar;
import android.widget.TextView;
import android.widget.Toast;

import java.util.List;

public class DataAdapter extends RecyclerView.Adapter {
private final int VIEW_ITEM = 1;
private final int VIEW_PROG = 0;

private List<Student> studentList;

// The minimum amount of items to have below your current scroll position
// before loading more.
private int visibleThreshold = 5;
private int lastVisibleItem, totalItemCount;
private boolean loading;
private OnLoadMoreListener onLoadMoreListener;


public DataAdapter(List<Student> students, RecyclerView recyclerView) {
studentList = students;

if (recyclerView.getLayoutManager() instanceof LinearLayoutManager) {

final LinearLayoutManager linearLayoutManager = (LinearLayoutManager) recyclerView
.getLayoutManager();


recyclerView
.addOnScrollListener(new RecyclerView.OnScrollListener() {
@Override
public void onScrolled(RecyclerView recyclerView,
int dx, int dy) {
super.onScrolled(recyclerView, dx, dy);

totalItemCount = linearLayoutManager.getItemCount();
lastVisibleItem = linearLayoutManager
.findLastVisibleItemPosition();
if (!loading
&& totalItemCount <= (lastVisibleItem + visibleThreshold)) {
// End has been reached
// Do something
if (onLoadMoreListener != null) {
onLoadMoreListener.onLoadMore();
}
loading = true;
}
}
});
}
}

@Override
public int getItemViewType(int position) {
return studentList.get(position) != null ? VIEW_ITEM : VIEW_PROG;
}

@Override
public RecyclerView.ViewHolder onCreateViewHolder(ViewGroup parent,
int viewType) {
RecyclerView.ViewHolder vh;
if (viewType == VIEW_ITEM) {
View v = LayoutInflater.from(parent.getContext()).inflate(
R.layout.list_row, parent, false);

vh = new StudentViewHolder(v);
} else {
View v = LayoutInflater.from(parent.getContext()).inflate(
R.layout.progress_item, parent, false);

vh = new ProgressViewHolder(v);
}
return vh;
}

@Override
public void onBindViewHolder(RecyclerView.ViewHolder holder, int position) {
if (holder instanceof StudentViewHolder) {

Student singleStudent= (Student) studentList.get(position);

((StudentViewHolder) holder).tvName.setText(singleStudent.getName());

((StudentViewHolder) holder).tvEmailId.setText(singleStudent.getEmailId());

((StudentViewHolder) holder).student= singleStudent;

} else {
((ProgressViewHolder) holder).progressBar.setIndeterminate(true);
}
}

public void setLoaded() {
loading = false;
}

@Override
public int getItemCount() {
return studentList.size();
}

public void setOnLoadMoreListener(OnLoadMoreListener onLoadMoreListener) {
this.onLoadMoreListener = onLoadMoreListener;
}


//
public static class StudentViewHolder extends RecyclerView.ViewHolder {
public TextView tvName;

public TextView tvEmailId;

public Student student;

public StudentViewHolder(View v) {
super(v);
tvName = (TextView) v.findViewById(R.id.tvName);

tvEmailId = (TextView) v.findViewById(R.id.tvEmailId);

v.setOnClickListener(new OnClickListener() {

@Override
public void onClick(View v) {
Toast.makeText(v.getContext(),
"OnClick :" + student.getName() + " \n "+student.getEmailId(),
Toast.LENGTH_SHORT).show();

}
});
}
}

public static class ProgressViewHolder extends RecyclerView.ViewHolder {
public ProgressBar progressBar;

public ProgressViewHolder(View v) {
super(v);
progressBar = (ProgressBar) v.findViewById(R.id.progressBar1);
}
}
}


Source Code Link

Sample Apk Link 


ScreenShots
=========


Sample Demo
==========